What is Bleed?
Bleeds allow you to run artwork to the edge of a page. On a press, the artwork is printed on a large sheet of paper and then trimmed down to size. If you do not allow for a 1/8 of an inch bleed, any misalignment while cutting will result with the artwork not running to the edge of the paper. Bleeds ensure you get the results you need (see example below).
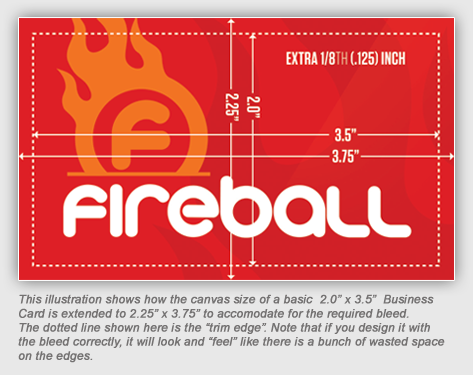
Build your files 1/8" larger than the final trim size. For example, if you have designed a standard 3.5" x 2" business card with a red background covering the whole area, you will need to enlarge that red background to 3.75" x 2.25". This will make the red background extend 1/8" on every side of the page.
Why is adding a Bleed necessary?
Small mechanical variations can end up leaving a hairline white edge where there should be no white edge at all, if the image is not extended beyond the final trim size. Extending images 1/8" beyond the final trim size guarantees that images truly will go all the way to the edge of the printed paper.
How do I add bleed to my design?
The first thing to remember is that "Adding The Bleed" is something that (should) take place at the beginning of designing your piece. Trying to "add" the bleed later will ultimately cause you more problems and could even result in having to pay for a "mechanical" fix from us. Here are some tips on how to get set-up from go and to make sure that your canvas size is bleed-ready...
 Adobe Photoshop
- Open Photoshop and click File > New...
- Enter the FULL BLEED dimensions. That is, 1/4" extra both vertically and horizontally.
- Set the Resolution at 300 pixels/inch
- Set the Color Mode to CMYK.
 Adobe Illustrator
- Open Illustrator and click File > New...
- Enter the TRIM dimensions in the Width and Height boxes (for example, the trim dimension on a standard business card would be 3.5" x 2")
- Enter 0.125 for the top, bottom, left and right bleed
- Set the the Color Mode to CMYK
- Set the Raster Effects at High (300ppi)
 Adobe InDesign
- Open InDesign and click File > New > Document...
- Enter the TRIM dimensions under Page Size (for example, a standard business card would have trim dimensions of 3.5" x 2")
- If you do not see "Bleed and Slug" at the bottom of the window, click the "More Options" button.
- Enter 0.125 for the top, bottom, left and right bleed